Nicht mehr benötigte iOS-Apps aus iTunes entfernen

Im Laufe der Zeit hat man sicher jede Menge Apps aus dem iTunes-App-Store heruntergeladen, die man dann doch wieder löscht, weil sie einem nicht gefallen oder man sie nicht mehr benötigt. Allerding sammeln sich diese Apps in einem Ordner auf dem PC an und benötigen dort schnell einige Gigabytes an Speicherplatz.

Nachfolgend beschreibe ich die Schritte, um diesen Ordner aufzuräumen und nur noch die Apps zu speichern, die in einem Ihrer iOS-Geräte noch vorhanden sind:

Schritt 1: Alle iOS-Apps in iTunes löschen

Als erstes müssen Sie alle iOS-Apps aus Ihrer iTunes-Bibliothek löschen, auch die, die Sie später behalten wollen. Öffnen Sie dazu iTunes, klicken dann auf das “Apps”-Icon und wählen “Meine Apps” um alle gespeicherten Applikationen anzuzeigen.

ScreenClip

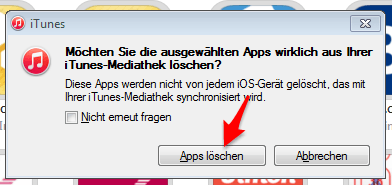
Dann selektieren Sie alle Anwendungen mit der Tastenkombination “Strg-A” und drücken dann die “Entf”-Taste um alle Anwendungen zu löschen. Bestätigen Sie das Löschen aller Anwendungen durch klicken auf “Apps löschen”

ScreenClip (1)

Keine Sorge, die Anwendungen, die auf Ihren iOS-Geräten heute wirklich installiert sind, werden wir nachher wieder zurückholen. Es wird also nichts dauerhaft gelöscht, was sie noch benötigen.

Schritt 2: Löschen alle zusätzlichen Apps

Nach dem Sie alle Anwendungen aus iTunes gelöscht haben, kann es sein, dass immer noch einige Apps im Ordner des Dateisystems übrig bleiben. Um diese auch zu löschen, beenden Sie nun iTunes und öffnen den folgenden Pfad im Windows Explorer:

Eigene Musik -> iTunes -> iTunes Media -> Mobile Applications

Sollten sich hier noch Dateien mit der Endung “.ipa” befinden, dann diese auch alle mit “Strg-A” markieren und mit der “Entf”-Taste löschen. Der Ordner sollte nun leer sein.

Schritt 3: Alle noch genutzen Apps wieder importieren

Da Sie nun keine Apps mehr in iTunes gespichert haben, müssen Sie von all Ihren iOS-Geräten die darauf befindlichen Apps wieder nach iTunes importieren. Öffnen Sie dazu wieder iTunes und schliessen Sie Ihr iPhone oder iPad an (noch nicht synchronisieren!). Wählen Sie dann folgende Option aus dem iTunes-Menü aus:

“Datei -> Geräte -> Einkäufe von “<Name Ihres Geräts>” übertragen

ScreenClip (2)

Nun werden alle Apps, die sich auf Ihrem Gerät befinden wieder nach iTunes übertragen. Führen Sie diesen Schritt nun für alle Ihre Gerät durch. Nun sollten sich alle Apps, die Sie derzeit wirklich noch benutzen wieder in der “Apps”-Ansicht von iTunes wiederfinden.

Alle nicht mehr benutzten Apps bleiben dauerhaft gelöscht (und nehmen damit auch keinen Speicherplatz mehr auf der Platte weg).

Tivoli Directory Integrator: Unable to install Fixpack

While trying to install the fixpack for Tivoli Directory Integrator I got the following message:

"the installc executable launcher was unable to locate its companion shared library"

The reason was some incompatibility with the network share where the installation sources were located. They were mounted via NFS from an EMC Isilon SAN device. After we copied the installation sources from the EMC Isilon to a NetApp device and shared it from there, everything worked without problems.

Another solution would be to copy the installation sources to a local drive and start installation from here.

Unfortunately we were not able to find the root cause of the problem (means, the configuration issue on the EMC Isilon share).

IBM Connections: Connection to LDAP is lost after some time

Customer has connected IBM Connections (means: Websphere Application Server) to an Atos DirX directory. The federated repository has been configured as “CUSTOM” type. After starting the Deployment Manager everything works, and the local wasadmin user and also admin users from the LDAP can login successfully.

However after some time (about 5-10 minutes) neither the local nor the LDAP users can login to the Deployment Manager. After you restart the Dmgr it does work for some time again.

In the SystemOut.log you will find messages like that:

[codesyntax lang=”text”]

UserRegistryI E SECJ0363E: Cannot create credential for the user  because of the following exception com.ibm.websphere.wim.exception.WIMException 
Caused by: java.lang.NullPointerException

[/codesyntax]

In order to fix that issue I changed the following configuration in the WAS System Console:

  1. In admin console, navigate toGlobal security > Federated repositories > Manage repositories > <repository_id> > Performance
  2. Enable the check box of “Enable context pool”  and set context pool timeout to “180”Save the configuration and restart the server
  3. In this environment I was unable to save the settings of this page until I enabled also the two cache parameters at the bottom of this page.

So the page looked like that:

Clipboard01

IBM Connections 5: NextGen theme not displayed

After installation of IBM Connections 5.0 the new look & feel (NextGen UI) is not displayed. The UI still looks like the old 4.5 theme. In addition you find the following error in the SystemOut.log

[codesyntax lang="text"]
net.jazz.ajax.internal.util.TraceSupport error A dependency on "com.ibm.lconn.core.styles.oneui3/gen4Theme/package3RTL.css.css" could not be resolved.
[/codesyntax]

The reason seems to be some stale data in the WAS temp directory. To solve the issue, shutdown the Connections servers and delete the content from the following directory:

{WAS Install Dir}/AppServer/profiles/AppSrv1/temp/{nodeName}

Then restart the servers again. The theme should now be displayed correctly.


IBM Connections: Installing Connections with LDAP user

If you are using a user from the LDAP for installing IBM Connections make sure that you are using the specified login name (e.g. “uid”) of that user and NOT the full distinguished name (DN). Otherwise you might have trouble with configuring FileNet (CCM) later.

While running “createGCD.sh” resp “createGCD.bat” you will get errors like that:


[codesyntax lang=”text”]

LTPAServerObj E   SECJ0369E: Authentication failed when using LTPA. The exception is com.ibm.websphere.wim.exception.PasswordCheckFailedException: CWWIM4537E  No principal is found from the '' principal name.
SystemOut O 5909022 [PESecondary1] ERROR com.ibm.connections.directory.services.engine.DSXSearchEngine - CLFRK0004E: Directory Service Extension(DSX) received a HTTP response from URL 'https://sever.acme.com/communities/dsx/membership.do?idKey=&role=3' expected XML, received unexpected content-type 'text/html;charset=UTF-8'! 
SystemOut O 5909023 [PESecondary1] ERROR com.ibm.connections.directory.services.engine.DSXSearchEngine - X-LConn-Auth=false
SystemOut O 5909023 [PESecondary1] ERROR com.ibm.connections.directory.services.engine.DSXSearchEngine - /communities/login returned:

com.filenet.api.exception.EngineRuntimeException: FNRCE0066E: E_UNEXPECTED_EXCEPTION: An unexpected exception occurred. The unexpected exception is chained to this exception. Message was: com.ibm.connections.directory.services.exception.DSOutOfServiceException: com.ibm.connections.directory.services.exception.DSOutOfServiceException: CLFRK0004E: Directory Service Extension(DSX) received a HTTP response from URL 'https:///communities/dsx/membership.do?idKey=&role=3' expected XML, received unexpected content-type 'text/html;charset=UTF-8'! failedBatchItem=0
 at com.filenet.engine.security.VMMProviderWaltzImpl.getUserByShortName(VMMProviderWaltzImpl.java:212)
 at com.filenet.engine.security.ConnectionsProvider.getUserByShortName(ConnectionsProvider.java:88)
 at com.filenet.engine.security.DirectoryServiceDriver.sspGetUserByName(DirectoryServiceDriver.java:1184)

[/codesyntax]


If you try to open the Filenet Admin console via http://server.acme.com/ACCE you wil get the following error:

"Unable to get data from server"


If you have already installed Connections with the wrong user name you can solve the issue by changing the user dn to the uid in the following locations:

  • J2C alias “connectionsAdmin”
  • j2C alias “filenetAdmin”
  • All roles in all WAS applications which have been set to the “wrong” username
  • All references to the user in the file “<Connections install dir>/config.properties”

Stop and start all Connections clusters and re-run “createGCD.sh” resp “createGCD.bat”. You now should be able to successfully complete the Filenet / CCM configuration.

Logviewer for Windows

If you work with products like IBM Connections, IBM Sametime etc. you need a tool to view all the Websphere logs without the need to manually open them one by one. I used Baretail if the log files were on a Windows server and Multitail for log files on Linux machines. What I missed was a tool which let me see both Windows and Linux log files together on my Windows workstation.

I just found Log Expert which seems to be exactly what I need. It lets you open files from your local disk, from a Windows file share or from a Linux server via SFTP. It has all the functionality of Baretail Pro and is completely free.

Sample of all the relevant log files of my IBM Connections 5 test system:

logexpert

IBM Sametime 9: Connection Problems to Sametime Video Manager

After installing the Sametime 9 Media Manager components I had problems to connect from the System Console to the Video Manager. E.g. you were unable to edit the default media manager policy as you got the error “AIDSC#####: Could not connect to Sametime Video Manager. Either VMgr is not installed or server is not up. Please retry after installing VMgr or starting it.”.

If you try to change settings for the Video Manager (e.g. adding the Video MCU information) you see the error “An error occurred while adding or editing this Video MCU”.

The problem here was, that the websphere admin user (in my case “wasadmin”) did not have the necessary roles. To solve that you need to connect to the Polycom DMA 7000 console.

The URL for the console is “https://[videomanagerhostname]:8443/dma7000/”. Use “admin” as the username and “admin” as the password to login.

Then choose “User -> Users” from the menu. You should now see a list of user IDs which are defined in the system. One of the should be “admin” and the other one your Websphere admin user (here: “wasadmin”).

Right-click on the “wasadmin” user and choose “Edit” and then “Associated Roles”. Add all three roles to the user so that it then looks like this screenshot:

Snap2

After clicking “OK”, the issue should be solved.

[Special thanks to Frank Altenburg]

Sychronize Google Contacts with Thunderbird

To synchronize Google Contacts with Thunderbird I used Google Contacts in the past. It seemed that this add-on no longer worked for me with the newest Thunderbird version. So I looked around a bit and found a replacement which seems to work fine: gContactSync. The reviews for that add-on state that there are some bugs which might lead in deleting contacts from Google randomly. However, I only use it one way (my primary source is Google and I only write to Thunderbird)  so it is not an issue for me.